| |
 Edit
Surface Type Edit
Surface Type |
 |
This is the main
map editing mode.
To change the surface
type:
Turn the mode on.
Press the left
mouse button when appropriate surface type appears.
Point the mouse
cursor at the square you wish to change.
Cursor will change
to 
Press the left
mouse button.
The map editor
will automatically incorporate your changes into the existing
terrain. Therefore, the nearby tiles will be changed accordingly.
List of possible combinations can be found here.
WANING!When
the map editor is not able to correctly determine the surface
type, unresolved squares will be marked as "stones on
land" type.
If you wish to
change a group of tiles, do not release the mouse button and
drag over the tiles you wish to change..
Select
Undo or <CTRL> + Z to cancel your changes.
|
 Alternative
Surface Type Alternative
Surface Type |
| |
Toggles through available
terrain choices.
To modify surface
type:
Turn this mode
on.
Point the mouse
cursor at the tile you wish to change.
Cursor will
change its shape to 
Press the left
mouse button.
When you release
the button, the given square will change to alternative tile.
Click-dragging
over multiple tiles will equally change these tiles.
Select Undo or <CTRL>
+ Z to cancel your changes.
|
 Special
Surface Type Special
Surface Type |
| Special tiles exist
for some types of terrain, such as a puddle on grass, bulrushes
and stones in water etc.
It is also used
for smoothing out sharp angles.
To create special
surfaces:
Turn the mode on.
Point your mouse
cursor at the square you wish to change.
Cursor will
change its shape to
Press the left
mouse button
When the button
is released, the tile will change to a special type. Keep
clicking for different tile possibilities.
Move the mouse
holding down the mouse button to change other tiles to the special
tile type..
WARNING!
We recommend using this option only for final map touch-up.
Select
Undo or <CTRL> + Z to cancel your changes.
|
|
 Changing
Altitude Changing
Altitude |
| |
To change the height
of a tile:
Turn the mode on.
Place the cursor
over the tile whose height you wish to change. The cursor
will change to a 
Press the left
mouse button.
Moving mouse
vertically will change height of the given square
Moving the mouse
horizontally across several tiles smooths out the height transition
over those tiles.
Having obtained
necessary height release button.
To level the landscape:
Turn the mode on.
Place the cursor
over the tile whose height you wish to select. The cursor
will change to a
Press (and do
not release) the right mouse button.
When moving
the mouse to adjoining tiles, they will change to the appropriate
height. Nearby tiles will be smoothed automatically.
Release mouse
button.
Select Undo or <CTRL>
+ Z to cancel your changes.
|
 Placing
objects Placing
objects |
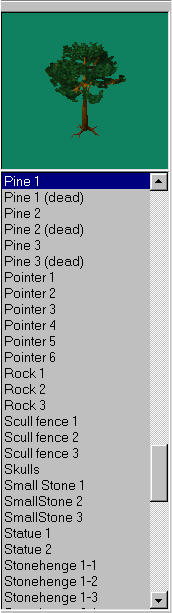 |
When enabling the
given mode a cursor changes to , and toolbar shown left appears.
By pressing the
left mouse button you can put the current object on the map.
By pressing the
left mouse button & holding the <SHIFT> key the
object under the cursor will be deleted. Alternatively, you
can hit the <Delete> key to delete the object.
When you press
the right mouse button, object under cursor will be selected
in the toolbar.
|
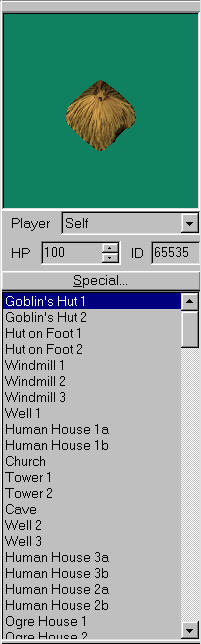
 Placing buildings
 |
When enabling the
given mode a cursor changes to , and toolbar shown right appears.
By pressing the
left mouse button you can put the current building on the map.
If You press and hold left mouse button at the structure on
the map, you can drag it to other location.
By pressing the
left mouse button & holding the <SHIFT> key the
building under the cursor will be deleted. Alternatively, you
can hit the <Delete> key to delete the building.
When you press
the right mouse button, the building under the cursor will be
selected in the toolbar. You can change it appearance, and left-click
back on the building on the map if you wish to apply the
changes.
However, some
buildings (shops, inns, usable pointers) may have special attributes.
You can press "Special" button on toolbar to change it.
|
 |
 Placing dynamic-size bridges
 |
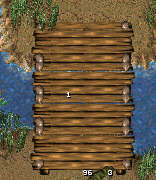 |
When enabling the
given mode a cursor changes to . .
By pressing the
left mouse button you can put the bridge on the map. It's size
can be modified by moving the mouse cursor with the mouse button
pressed.
By pressing the
left mouse button & holding the <SHIFT> key the
bridge under the cursor will be deleted. Alternatively, you
can hit the <Delete> key to delete the building.
When you press
the right mouse button, you will change the size of the bridge
under cursor to reach the current pointer position until button
will be released.
|
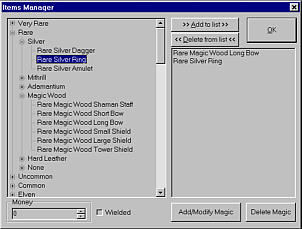
 Work with items
 |
- When enabling
the given mode a cursor changes to
 . .
- By pressing
the left mouse button the dialog box shown right appears. After
selecting nesecery items and pressing OK in the dialog box,
the results may differ depending on the current object
under the cursor.
- In case
it was a bag or a free tile - the bag with selected items appears.
In case it was a unit - selected items will be transfered to
its inventory.
- By pressing
the left mouse button and holding the <SHIFT> key
the bag under the cursor will be deleted. Alternatively, you
can hit the <Delete> key to delete the bag.
|
 |
 Placing
units Placing
units |
 |
When enabling
the given mode a cursor changes to ,
and unit's toolbar shown left appears. ,
and unit's toolbar shown left appears.
By pressing
the left mouse button you can put the current unit on the
map. If you press and hold the left mouse button pointing
at a unit on the map, you can drag it to another location.
By pressing
the left mouse button & holding the <SHIFT> key
the unit under the cursor will be deleted. Alternatively,
you can hit the <Delete> key to delete the unit.
When you press
the right mouse button, the unit under the cursor will be
selected in the toolbar. You can change it appearance, and
left-click back on the unit on the map if you wish to apply
the changes.
You can also
change repop (monster restoration) parameters for currently
selected group by pressing the "Repop" button.
|
 Interactive music
 |
- When enabling
the given mode a cursor changes to
 . .
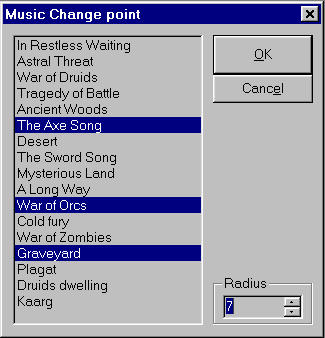
- By clicking
with the left mouse button on the map the dialog box shown right
appears.
- You can
select up to 4 themes to play when your hero enters the area
around the click point with the previously selected radius.
- By pressing
the left mouse button & holding the <SHIFT> key
the music area under the cursor will be deleted.
|
 |
 Logic Logic
|
 |
When enabling the
given mode a cursor changes to . .
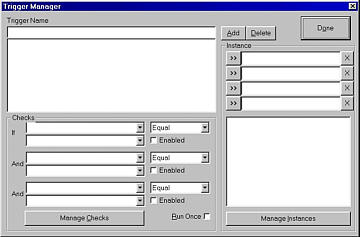
Left clicking on
the map calls the dialog box shown left.
This menu should
only be used to install your starting point. Choose your favorite
place, then click on it. Choose "Manage Instances", and click
on "Drop Location" option on the left side of the menu. Select
"Add New" and then press "Done".
We recommend using
this menu only for the Drop Location. You can try others, but
the risk will be all yours.
Use
right mouse button click on the map for Traps/Structure casting
menu.
|
 Toggle
Grid Toggle
Grid |
| Turns
grid (red lines over the map tile borders) on and off.
WARNING:
This function affects
current window only.
|
|
 Toggle
randomization Toggle
randomization |
| |
To randomize tiles
automatically, click on the randomization button. Alternatively,
you can select alternate surface types by selecting
In addition, you
can randomize the whole map by selecting Randomize Entire Map
in Instruments section
of the main menu, or by pressing <CTRL> + E.
Undo will
return you to the condition before your first call to the randomization
function.
|
 Light
source settings Light
source settings |
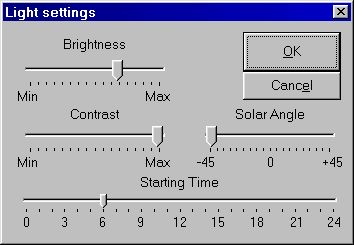 |
Dialog box shown
left appears when you enable the given mode.
Brightness
- modifies brightness of a light sourse. Contrast - modifies
contrast of scenes and Solar Angle - modifies its position.
After setting all
necessary parameters press the button for acknowledgment OK
or Cancel for canceling.
WARNING:
The lght sourse setting affects the entire map, and not just the
current window.
The
light sourse Position is assigned in degrees, "0" corresponds
to the direction "from the user's perspective".
|
|
|